
Updated on 2024-02-01
5min read
Have you entered the wrong passcode excessively that your iPhone displays the “connect to iTunes” screen? If so, and you are looking to bypass the iPhone disabled screen without losing any data, then this post is definitely for you.
As we all know, when your iPhone displays the security lockout or “connect to iTunes” screen, it’s most likely you wipe your device to reclaim access. However, that’s not necessary sometimes, as iOS experts have devised means of unlocking a disabled iPhone without clearing your data. Eager to discover and apply the solution? Then keep reading, as we walk you through the 6 simple yet effective troubleshooting techniques to bypass disabled iPhone without losing data.
1. Brief About Disabled iPhone
Before looking at the solutions to bypass your disabled iPhone without losing any data, here is a brief about the security challenge to expand your knowledge.
1. Why is My iPhone Disabled?
Incorrect passcode is the reason your iPhone is currently disabled!
Passcode as we all know is the unique code you enter to unlock your device. Entering this code wrongly means you cannot access the device. However, there’s a limit to the number of wrong attempts you can try before getting disabled. For instance:
5 wrong attempts would disable your iPhone for 1 minute.
7 wrong attempts would automatically lock your device for 5 minutes.
8 incorrect attempts get your iPhone disabled for 15 minutes.
9 consecutive wrong attempts disable your iPhone for 60 minutes.
10 incorrect attempts would lock your iPhone permanently, requiring you to connect iPhone to iTunes.
2. Can I Bypass a Disabled iPhone without Losing Data?
Sure you can!
Since the majority of iPhone unlock solutions usually result in the clearing of the entire content and settings on the device, your old backup is the only option available to retrieve data after losing.
However, you can also try Siri or use your previous passcode to bypass your disabled iPhone without losing data. However, these solutions work for selected operating systems. As for the previous passcode troubleshooting technique, your iPhone must be running on iOS 17. For the Siri solution on the other hand, you need an iPhone running on iOS 8.0 or 10.1.
2. How to Bypass Disabled iPhone without Losing Data [No Data Backup]
Employ any of the simple solutions shared here to bypass your disabled iPhone screen without losing your precious data.
Method 1: Use Previous Passcode (iOS 17 or Later)
iOS 17 and later versions come with a fantastic security unlock solution to unlock a disabled iPhone. There is no data loss in this situation, also you do not need a computer system. However, you must recollect your previous passcode for this solution to work. Another crucial criterion is to ensure your passcode has been changed once in the last 72 hours.
If you meet all of these, use the steps below to try this feature.
Step 1: Check the bottom right corner of your screen for the Forgotten Passcode? button and tap on it.
Step 2: Your iPhone will direct you to another screen suggesting that you can use your previous passcode to unlock your device. Enter the old passcode you changed from in the last 72 hours, and set a new passcode to bypass your disabled iPhone.
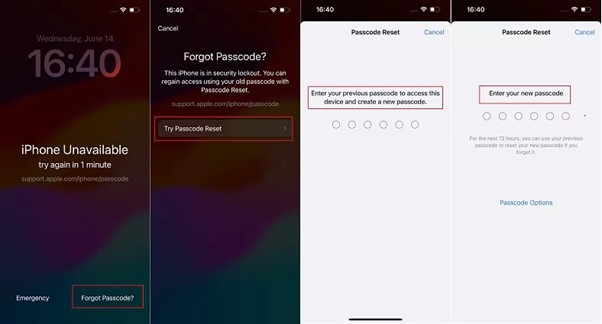
Limitations
- You must have changed your passcode in the last 72 hours.
Method 2: Use Siri
This solution is available for limited operating systems, usually iOS 8.0 and 10.1, which is most likely for older iPhones.
Use the steps below to unlock your disabled iPhone via Siri.
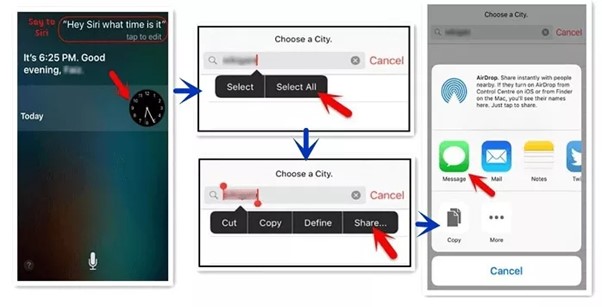
Step 1: Press down the Home button till Siri comes up on your iPhone. Speak to Siri “what time is it”. Wait patiently for Siri to display a clock on your screen.
Step 2: Click on the clock and your iPhone will launch the World Clock immediately. Next, click on the + at the top right corner of your display screen to customize your own time.
Step 3: Enter any word or text in the empty box and highlight it. After that, some options will automatically pop up. Choose Share and select the Message app as your preferred mode to export the selected text or word.
Step 4: Next, enter any text in the To field and hit the Return button on your iPhone keyboard. Once that’s completed and the text turns green, click on + to create new contact. Without further ado, you will be directed to the New Contact Screen.
Step 5: Tap on the Add Photo button and tap on the Choose Photo icon. Select your desired photo album to choose from, then wait a while and click the Home button. Your iPhone should be unlocked in no time.
Limitations
- Not a suitable solution to bypass a disabled iPhone running on iOS 11 or later.
- Using Siri to unlock your iPhone is quite lengthy.
- If you don’t have Siri enabled, there’s no way to bypass your disabled iPhone.
3. How to Unlock Disabled iPhone without Losing Data [Backup Needed]
Here are alternative options you can try out when the aforementioned don’t work for your iPhone. Please ensure you have a backup before employing any of these to avoid complete data loss.
Method 1: Use Passixer iPhone Unlocker
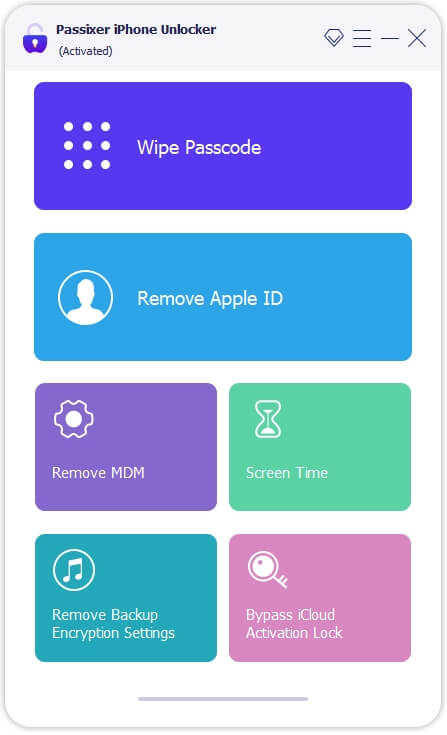
Passixer iPhone Unlocker is powerful iOS unlocking software suitable for reclaiming complete control of your iPhone when you are stuck on the disabled screen. With this software, you can conveniently unlock any iPhone or iPad model without passcode from the comfort of your home, all thanks to the simplified interface. No iTunes or iCloud is required when using this versatile software. Passixer’ functionality extends beyond bypassing a disabled screen. You can also use it to unlock iTunes backup, Apple ID, bypass MDM, and many security challenges worth fixing on your device.
Key Features
- Fix your disabled iPhone with just a few clicks.
- Passixer iPhone Unlock bypasses iCloud activation lock and Screen Time Passcode on any iPhone or iPad model.
- Compatible with all the iOS versions, including iOS 17.
- Extra unlock features: remove Apple ID, bypass MDM (also known as device supervision), remove iTunes backup password.
Stepwise Guide to Unlock Disabled iPhone without Data Loss Using Passixer iPhone Unlocker
Step 1: Start by downloading Passixer iPhone Unlocker from the official website on a computer. Install it and run it to help you unlock your iPhone. Select Wipe Passcode when the quick start screen pops up.
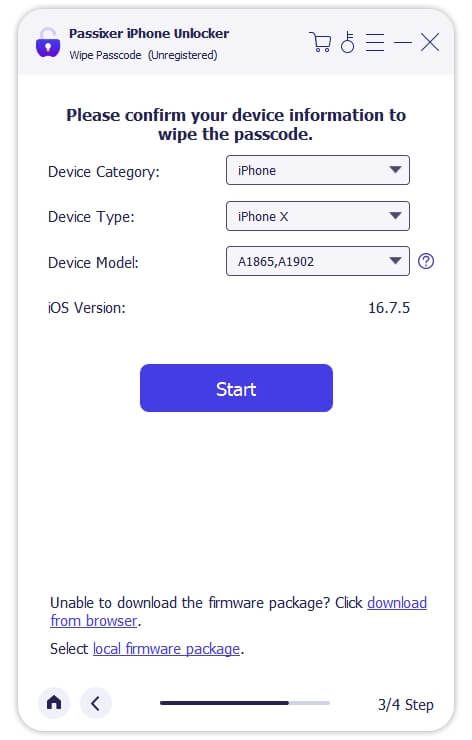
Connect your disabled iPhone to the computer using a reliable USB cable and click Start.
Step 2: Passixer will detect your device, scrutinize the system and display some details about it on your screen. Compare the details with what you have and click Start to proceed further. Next, Passixer will download a firmware package for iPhone disabled bypass.
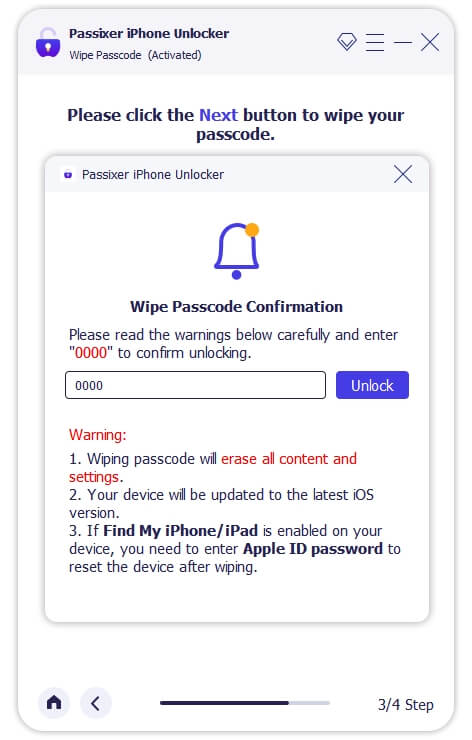
Step 3: After completing the download, tap on Unlock, and type 0000 in the empty field provided. Once done, proceed to click Unlock to commence unlocking immediately.
Method 2: Use iCloud
Another effective troubleshooting solution to activate a disabled iPhone is erasing the device via iCloud. With the Find My feature on iCloud, you can effortlessly wipe any iPhone remotely. What you need is to ensure the Find My feature is active on the device, and the Apple ID details connected to it. Once that’s set, you are good to regain access without spending a dime.
To commence this iPhone unlock process, use the steps below.
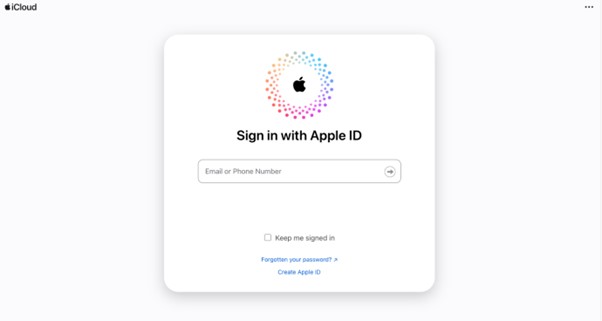
Step 1: Open the official homepage for iCloud, and click the sign in button. Type your Apple ID and the corresponding password in the required box. After that, proceed to log in your profile.
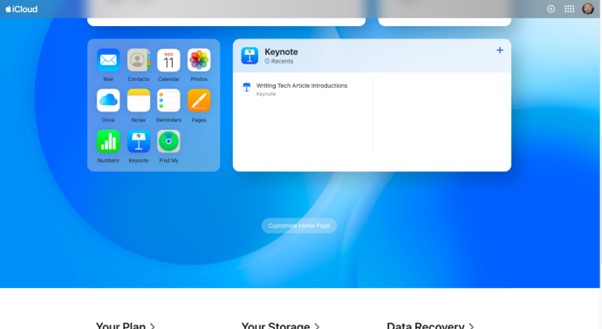
Step 2: If required, you might have to check one of the Apple devices connected to your iPhone for a 2FA code. Copy and enter the code in the required box, and select Find My when your iCloud profile page appears.
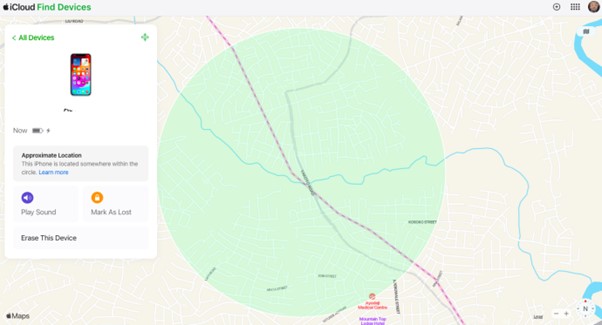
Step 3: Select the All Device drop-down menu on the next screen and choose the disabled iPhone from the list displayed.

Step 4: Wait until iCloud locates the device and shows the screen shown here. Click on the Erase iPhone button situated on the left hand side of your screen. Confirm your entry by entering your Apple ID again, then click Erase iPhone to complete the process.
Limitations
- Find My must have been activated on the iPhone in the past.
- Your correct Apple ID details are needed.
- Data loss will surely occur.
Method 3: Use iTunes
With iTunes you can also enable a disabled iPhone all by yourself. This solution involves the complete restoration of your device, which often clears your entire system. Enabling your disabled iPhone via iTunes is very simple. You can use the instructions below.
Step 1: Install the most recent version of iTunes on a Windows computer, macOS Mojave or lower, and then launch it.
Step 2: Activate recovery mode on the iPhone. Here’s how to enter recovery mode on the different iPhone models:
- iPhone 8 and Later: As quickly as you can, press down the Volume Up button, then release, Do the same for the Volume Down button and release again. Finally, hold down the Side button till you discover a screen with USB cable.
- iPhone 7/7 Plus: Simultaneously hold down the Volume Down key + Side key. Press down these buttons until your device enters the recovery mode.
- iPhone 6 and Older: Press down the Home button + Side button together at the same time till you discover the recovery mode screen.
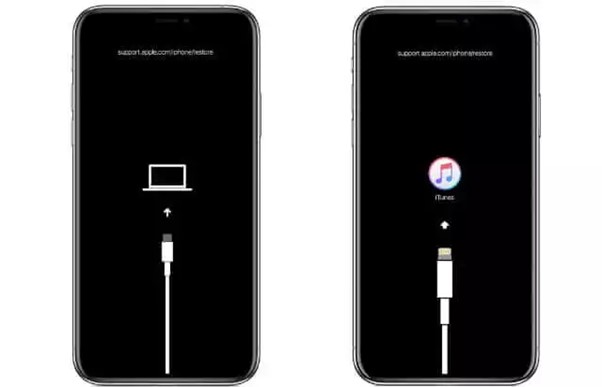
For folks who don’t know how the recovery mode screen looks like, here is a pictorial representation:
Step 3: Next, proceed to connect it to the computer via a USB cable. Once iTunes detects the device, a Restore and Update prompt will immediately pop up on your screen. Tap the Restore button and wait until iTunes restores your system.

When the restoration is finished, your iPhone will be wiped with no data or information on it just like a newly bought device. If your previous backup files, you can reinstall them after setting up the device.
Limitations
- Backup is mandatory if you don’t want to lose your data files.
- iTunes is exclusive to Windows computers and macOS Mojave or older versions.
- The steps to follow is quite lengthy.
Tips: Restore Backup to iPhone After iPhone Disabled Bypass
You just have to click on Restore from iCloud Backup or Restore from iTunes Backup from the options displayed on the Apps & Data screen while setting up your iPhone.
Conclusion
Ultimately, fixing a disabled iPhone is nothing when you have the right tutorial guide at your disposal. The 6 effective solutions recommended by iOS experts have been introduced in the guide, just select the one that suits you and your iPhone model to reclaim control of your device. However, our best solution remains Passixer. The software handles your disabled iPhone with high accuracy and caution. It’s the simplest solution to employ with no complications.